Auto Save SharePoint 2013 new item form data within a given time frame
Auto save is a common functionality that can be found in many forms which is being used to capture vast amount of data in one entry form. Although the ultimate concept of SharePoint is to, "not to re-invent the wheel", has been the major reason for business users to choose SharePoint as the implementation platform, this particular functionality takes a little bit of development effort.
SharePoint 2013 providing a wide range of reach-ability to accomplish tasks via client side rendering, CSOM, JS link and very importantly via "REST" API.
The example i am about to explain is based on a small business requirement of auto saving user input data so that the data will not be lost in case of a browser time out or if the user close the button accidentally.
This particular functionality can comes in handy when the list item is associated with a SharePoint 2013 workflow.(Nintex or Visual Studio 2015 workflow). Well, its simply a separate topic to be discussed. I will be posting on how to implement a VS2015 workflow via a SharePoint 2013 app solution and integrate it with a list in host web in my next post.
OK. Lest start on Auto Save,
For the demonstration, i will be using a SharePoint 2013 site collection which i created on my Office 365 tenant.
Creating the List
I created the "Employee" list with following columns.
Of course a functionality like auto save is an over head to a list with couple of columns. But this is just for the purpose of explaining how the functionality works. So i just created couple of columns and when the user clicks on the new item form, our implementation should start acting.
Adding a custom button
The Save button in default new item form makes a server call to save the data to the list and then close the form. Although the default behaviour is that way, in our case, i want the save button to act as the final submit button. Means, even though user did not click on the save button, my form should automatically save data to the list item as long as the new item form is open.
So, in our case,the user interaction with the save button is actually an update.
Lets see how it works.
For the ease of illustrating, i am going to add a custom button to the new item form via a content editor web part.
Edit the new item form:
Add a content editor web part and a script editor web part.Content Editor web part : To add the custom button
Script Editor web part : Is where, our script goes
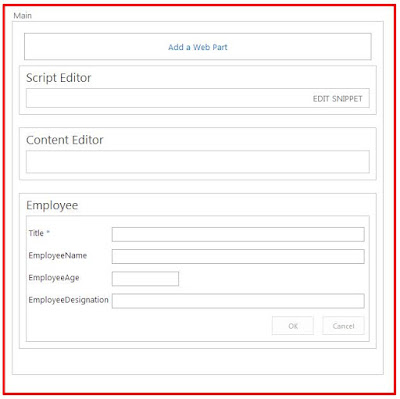
Here i am going to create a custom HTML form to make this more vivid.
Edit the content editor web part and add this custom HTML tags directly to the Edit Source section.
NOTE : Please note that this is not the best practice. In case you decide to use a custom HTML page as new item, edit or any form, its always the best way to add the HTML file to the site assets and give the reference link. Because in case if you come across changes in the future, that way you don't have to edit the page. You can simply edit your HTML file and get the changes reflected where they should be.
<table>
<tbody>
<tr>
<td> Title* </td>
<td>
<input type="text" id="titleTextbox"/>
</td>
</tr>
<tr>
<td> Employee Name: </td>
<td>
<input type="text" id="nameTextbox"/>
</td>
</tr>
<tr>
<td> Employee Age: </td>
<td>
<input type="text" id="ageTextbox"/>
</td>
</tr>
<tr>
<td> Employee Designation: </td>
<td>
<input type="text" id="designationTextbox"/> <br/></td>
</tr>
<tr>
<td>
<input type="button" id="saveButton" value="Save"/>
</td>
<td>
<input type="button" id="submitButton" value="Submit"/>
</td>
<td>
<input type="button" id="cancelButton" value="Cancel"/> <br/></td>
</tr>
</tbody>
</table>
Click "Ok" and you can see the rendered content.
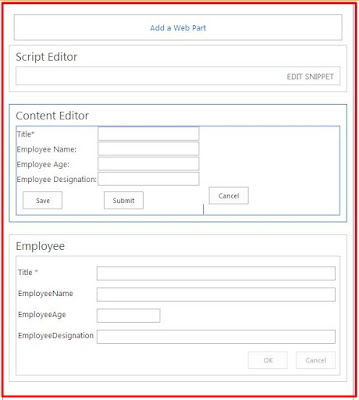
You can delete the default OOTB new item web part if you want. But for the moment i am going to keep it as it is.
Now lets write our script which act as the engine of the entire process of auto saving data.

You can delete the default OOTB new item web part if you want. But for the moment i am going to keep it as it is.
Now lets write our script which act as the engine of the entire process of auto saving data.
Auto Save Script
Edit the new item form and add the below script to the script editor web part.
<script type="text/javascript" src="https://ajax.aspnetcdn.com/ajax/jquery/jquery-1.9.1.min.js" ></script>
<script type="text/javascript" src="/_layouts/15/MicrosoftAjax.js"></script>
<script type="text/javascript" src="/_layouts/15/sp.runtime.js"></script>
<script type="text/javascript" src="/_layouts/15/sp.js" ></script>
<script type="text/javascript">
$(document).ready(function () {
//new list item id
var itemId;
//new list item
var newItem;
//target list object
var targetList;
//Current Client context
var clientContext;
(function() {
var executed = false;
if (!executed) {
executed = true;
//Get the current context
clientContext = SP.ClientContext.get_current();
var web = clientContext.get_web(); //gets the web object
var list = web.get_lists(); //gets the collection of lists
//Gets the target list
targetList = list.getByTitle("Employee");
//Create the list item instance
var listItemCreation = new SP.ListItemCreationInformation();
newItem = targetList.addItem(listItemCreation);
//Get the field value
var titleField = document.getElementById("titleTextbox").value;
var nameField = document.getElementById("nameTextbox").value;
var ageField = document.getElementById("ageTextbox").value;
var designationField = document.getElementById("designationTextbox").value;
//Set the field values to the list item object
newItem.set_item('Title', titleField);
newItem.set_item('EmployeeName', nameField);
newItem.set_item('EmployeeAge', ageField);
newItem.set_item('EmployeeDesignation', designationField);
newItem.update();
clientContext.load(newItem);
clientContext.executeQueryAsync(ItemCreationSuccess, ItemCreationFail);
};
})();
//On item creation success scenario
function ItemCreationSuccess() {
itemId = newItem.get_id();
alert("Item got created: "+newItem.get_id());
}
//On item creation fail scenario
function ItemCreationFail(sender, args) {
alert('Failed to create a new item. Error:' + args.get_message());
}
//Set interval to execute the auto call function
setInterval(autoCallFunctionforAutoSave, 10000);
//The call of this function will save the data to the specified list
function autoCallFunctionforAutoSave()
{
//Get the new item by item id
newItem = targetList.getItemById(itemId);
//Get the field value
var titleField = document.getElementById("titleTextbox").value;
var nameField = document.getElementById("nameTextbox").value;
var ageField = document.getElementById("ageTextbox").value;
var designationField = document.getElementById("designationTextbox").value;
//Set the field values to the list item object
newItem.set_item('Title', titleField);
newItem.set_item('EmployeeName', nameField);
newItem.set_item('EmployeeAge', ageField);
newItem.set_item('EmployeeDesignation', designationField);
newItem.update();
clientContext.load(newItem);
clientContext.executeQueryAsync(ItemUpdateSuccess, ItemUpdateFail);
}
function ItemUpdateSuccess()
{
alert("Item no: "+itemId+" got updated...");
}
function ItemUpdateFail()
{
alert("Fail to update the item..!!!!");
}
});
</script>
Here i have used the client side object model (CSOM) to save list item information.
At the beginning of the document ready, i have called an anonymous function to create the initial list item. As i have embedded the script to the new item form, the anonymous function will get execute and a new item will be added to the list during the page load.
During success call, i have captured the ID of the newly created list item.
//On item creation success scenario
function ItemCreationSuccess() {
itemId = newItem.get_id();
alert("Item got created: "+newItem.get_id());
}
After that in every 1000ms, i have called a "autoCallFunctionforAutoSave" function to update the item with the respective user input values.
//Set interval to execute the auto call function
setInterval(autoCallFunctionforAutoSave, 10000);
This will do the trick. But note , you can optimize this in various ways based on your actual requirement.
For an example, if you have more than 10 fields or even 5, its not nice to set values twice in both the anonymous function as well as the auto call function. You can extract the common section and separate it.
Now lets see how it works. :)
Once you add the script to the script editor web part, click on the stop editing and save the page. Now you have the script in your new item form page.
Go to the AllItems.aspx page of the Employee list.
click on "new item".
Now your script should start doing its magic.
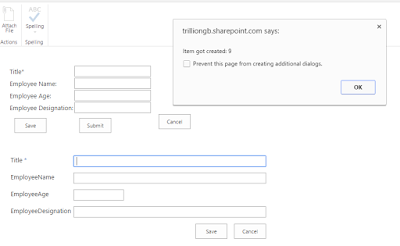
I put an alert for ease of getting notified when the item is created. So, when you first click on the new item link, an item will be created and added to the list. This is what the anonymous function does.
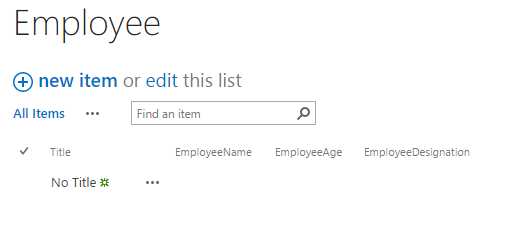
If you open the list in the next tab, you can see an item has been added already.
Meanwhile, the changes you are doing to the new item field is being captured within every 1000ms. I put an alert for the ease of demonstration.
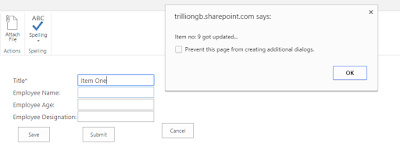
I opened the all items page in a new tab so that i can see the changes are being reflected as i do them.
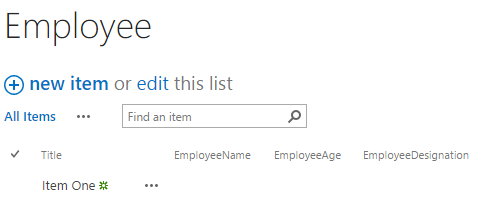
Note: I put alerts for the ease of demonstration. But when it comes to actual developments its always better if you can log the status via a console log.
So, this is it. :) I hope its helpful.


Was helpful. It worked for me. Thank you!!!
ReplyDeleteYou are well come. im glad to help out :)
ReplyDeletecan this be done using REST?
ReplyDeleteYes you can. Here i have saved and updated the list items using client side object model (CSOM). You can use REST CRUD operations instead.
ReplyDeletebut item number is increased when i click on new item but after I enter some data, the data is not appear in that item.
ReplyDelete